Hello out there!
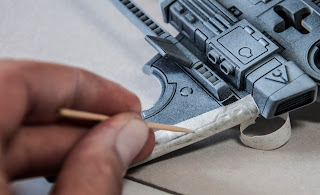
While painting the Razorshark I thought it would be nice to take some pictures of the masking process, as the Leman Russ Sqadron needed a different masking. We're not trying to paint camo here, it's more about getting crisp and clean edges.
As we don't have a tutorial about this I will make a short one for you, until the next big one including this is ready. I mean hey, many of you want to paint their Tau NOW!
Stuff required
-Masking tape (I use Tamyia) or crepe tape (cheaper, but you have to stick it to something before putting it onto the model)
- toothpicks
- scalpel
- any masking fluid (I used Humbrol Maskol)
What we do
First we prime everything. We could prime certain areas first, then mask others that should get darker or brighter and use white on them but this is much effort. I rather prime them again after the first color is applied. That's different with parts that are seperate. I used two component priming, but some things like the rifles should be black in the end anyways.
 |
| Again doublesided tape is our friend and holds everything for priming. Everything is primed black, then parts like the rifles are removed before applying the white primer. |
 |
| It always good to have some kind of holding device, this one used to scrubbed my back, before the cats got their paws on it. |
We first spray the interior (in this case the rocket mounting). As every layer of paint builds up with the following we don't want to much layers and have to mask the areas around. Things like cockpits, storage rooms etc are the same and have a simple shape. It is easy to tape around them.
Then just spray your chosen color and remove the tape AFTER the paint has dried to avoid getting paint from the tape to the surface of our vehicle. Be sure your tape sticks well and has no areas which are loose.
 |
| Well this was simple. |
But what about that nasty plating? Be happy, it isn't that difficult too. We use our masking tape again, laying it over the areas where different armor plates meet. First we use our toothpick, finger nails, whatever fits to press the tape into the recesses. then the rest of the tape is sticked to the surface.
Next step is removing the tape on the side we want paint. The scalpel is used where our toothpick hast lined out the recesses. After that the tape is removed on the side we want to airbrush next. In this case, the small area should remain white, while the rest will be orange/brown.
We mask everything we can reach without too much effort that way. It fits wherever two armor plates meet.
 |
| Even organic or round shapes are no problem with this method. It would be a pain to cut such shapes before applying them to the model. You can see that the front panel is already taped. |
But there are still areas I really don't want to tape!
No problem, I know that. There often are angles hard to reach. These are painted with the masking fluid, which protects them from spraypaint and can be removed very easy after we're done. Just make sure it is a thick coat, so you can remove the whole thing. I use a toothbrush to rub the stubborn fluid away where I didn't paint thick enough.
No problem, I know that. There often are angles hard to reach. These are painted with the masking fluid, which protects them from spraypaint and can be removed very easy after we're done. Just make sure it is a thick coat, so you can remove the whole thing. I use a toothbrush to rub the stubborn fluid away where I didn't paint thick enough.
 |
| The purple areas are masked with the Maskol. |
Then we spray our colors, let everything dry and remove the whole masking. It makes sense to spray the small areas first and than mask them, to paint the big ones. I did the other way (hey, I was really tired and in zombie mode) and it cost me most of the painting time to mask and unmask.
 |
| And everything looks fine and crisp. |
 |
| This is the result of bad organization. The whole thing is masked, just to protect a few little areas. A mistake you only make once, believe me. |
Hope there was some help for you.
Tonight the next Tau model waits, the hammerhead!
If you liked the article feel free to share it on Facebook or elsewhere in the community.
And don't forget, Razorshark Auction ends tomorrow!


Excellent Article my friend!
AntwortenLöschenAbsolute must-read for every aspiring vehicle builder!