Freitag, 28. Dezember 2012

Some small gifts

Christmas is over, and for me personal, this is not the worst thing.
Thousands of people crowding through the alleys of my city, places we visit every day through the year we just can't reach (or don't want...) cause no parking, no single step without being rumbled, think you know what I mean.
This disturbing "christmas music" from November till the 24th. and false smiling and talking everywhere.
Think I'll never understand why people who don't like each other pretend to be nice and fine with each other...anyways there are the good sides.
I loved christmas when I was younger, all the magic and atmosphere...guess you don't see the worst part of it in a small town with barely people to disturb you.
That's what I do when christmas comes closer, invite some of the old people from my hometown and new friends alike and we celebrate, never at the 24th.
Apart from this one special evening I try to stay away from all that shiny loud christmas stuff...
but even this evening needs presents.

Today I show you some quick shots of the two miniature related gifts I made this year.

As always, i ran short in time and so the quality of pics isn't the best...maybe someone likes them anyways.


The shed turned out to colorful for my personal taste, but my dad liked it and so everything is fine.
I'll definitely keep the rough texture in mind that the wire brush + stewalin created, it looks pretty cool I think.


The RPG charakter of one of my best friends, he is my neighbor, so there will be better pics when I find the time to take them. Maybe 5 or 6 hours and a lot of fun.

This little guy motivated me to work at my space wolve army, today the oils for the first squad will be done and some other projects will get attention...using the free time till university starts again.

Have a nice day.

Dienstag, 18. Dezember 2012

Introducing...Begbie! New Blogcrew finished!


Hello my dear readers,
today I'd like to use the real bad weather, the non motivated mood that keeps me away from painting and the fact, that my savage cats woke me up way to early.
Some weeks ago I told you there would be another painter joining us here at the (T)Raumschmiede.

I love his way of painting, black humor and one doesn't starve around his kitchen, quite good reasons to bind his soul to my digital workbench ;)

In the miniature community he is known as Begbie, Krawatte or just Klaus.

So let's have a little talk with the new guy!


F: Tell us who you are!

K: Well I'm 29 years old, studied chemical engineering and my heart beats for our beloved hobby since 6 years, if it's only painting and 13 years if it's miniature related. I'm from Bremen Germany, but since 9 years I'm moving around Germany due to my studies and now the job. At the moment I live in Dresden and I hope it stays this way for a long time.


F: Which art inspires you and why?

K: Can't really tell. I can say oh this miniature looks good, this one looks not so good. I'm not really the guy who is a real fan of somebody, I just like good paint jobs. Got the same problem with music, I can never tell who it's from, I just can tell that I like it. BUT I get Inspired by nicely painted miniatures, try to make out how the light and shadow was set, which colors are in there, how the mood was created and I try to let it flow into my works. Of cause I could make a list of people who potentially paint such figures which inspire me, but that would be a really long list. So no one special, just the whole scene you could say.


F: If you had to point out one painting related thing you're really good at...what would it be?

K: Well I'm not the kind of person who likes to praise himself. I'm really critic with my stuff. Well I like my stuff, but I try to point out every flaw in my works so next time I can avoid them or make it better. Well I wouldn't say my stuff is good, because there are a lot of painters million times better than me. Don't misunderstand, I like my stuff but being critic with my own work and painting, painting, painting, helps me getting better. Well maybe you could say, I'm good at criticizing myself without getting depressed, cause it motivates me.
Well I don't mean getting depressed motivates me, of cause.


I know, Bloodmaster had a few more questions, but hey, do you know how hard it can be to find questions to people you know? So if you have some questions, just write them down in the comments and Klaus will be answering as good as he can :)

And don't forget to check his gallery at puttyandpaint


Because we both live in the same town since a while, we're planning to paint weekly together...and I think starting january this will not just be planned, but done.

Read you soon.

Dienstag, 11. Dezember 2012

Building the shed - Part two

Welcome to the next steps :)
After the Stewalin was dry and hard, I searched a fitting socket.
I found one with nice color and stains, so I taped all the areas, where no paint should be.
Then I marked the edges at the Stewalin and used a saw to cut away parts of the wall, to fit it in.


The wall is glued to the socket, using waterproof wood glue.

I used my plans to cut out the two sides of the shed, just piercing through the plan, right onto the plasticard.
The wooden beams are 2mm Plasticard strips, the door beams 1 mm. I used the scalpel to scratch in a wooden texture and cut away the edges at some points.
The door section was scratched directly on the shed side, because this makes it bend, I glued some thicker plastic behind it.


Now just glue the sides together and than to the wall.


Samstag, 8. Dezember 2012

Creating Walls with Stewalin - Christmas presents rolling in

Today I'll show you a little tutorial about walls, there will be another one about building a little shed and finally painting the whole thing.

I needed something that would be easy and fast to finish, as my father still waits for last years present, which takes way to much time.

So I browsed the web, knowing he likes my modelling skills, but not my usual themes (no fan of military/destruction/decay...).
I thought of some articles I read a while ago and decided to build some kind of shed. It is a little thing and shouldn't be that complicated.

I ended up finding this:

A little building leaning against an old city wall. I loved the feeling and it reminds me of warhammer a bit, with it's puzzling imperial architecture.

Next step was to sketch a bit and plan the thing.


I used CAD Software, not because it's needed, just because I use it the whole day anyways. Every used shortcut helps remembering the damn things^^

The city wall itself will be casted in Stewalin, a gypsum used for miniature casting. It gets really hard and durable and is nice to work with.
Therefore, we build a mold with Styrodur Foamboard.
It isn't effected by water, and having a hot wire cutter makes working with it faster than other materials.

I used my printed plans to take the lengths and place everything...


To create the steps in the wall, I just used a few pieces of foam and layered my negative mold.

I taped all the edges, so no gypsum would flow out of gaps...

and failed :)
Well, that things just happen, no reason to be sad. I let the gypsum dry, so it closes the gaps and fill in more.

The Stewalin will dry fast, so we can unmold our wall.
Do this, when it's hard, but still moist.

There is a soft area, where the two layers of gypsum come together and this made me some trouble, I'll fix that later somehow.

Now I use a wire brush and stroke it randomly on the whole surface. 
After that I use a scalpell to cut in the stones, damages and so on. 


As you can see there is a big gap where the two layers met and the whole thing broke there, but hey, thats what putty was invented for...ok, it's not but I'll use it there anyways ;)

Stay tuned!

Mittwoch, 5. Dezember 2012

My Putty and Paint Gallery

I told you about  Putty and Paint a while ago.
The whole project is growing and you can see some breathtaking works there...no, not some...lots of them!
I have a gallery there myself, it can't compete with the most works there, but hey, compete isn't the idea behind it. It's sharing our passion and show works, that are important to us.

So you can find my gallery here: click

Dienstag, 4. Dezember 2012

Thoughts about revolution

I think most of you heard about Zaphod's big Painting Revolution.
Some love to ask themselves what all is about (and I bet some dream of possible things, each one crazy and Utopian, but nice to think of for a while - this alone is worth so much I guess)
some hate the advertisement and Big Z's way of acting...but I think really few don't give a fuck at all.
It polarizes the community and I think, this alone is something anyone can be proud of.
Making people dream, rage, and talk with each other is great.

The big Revolution...to be honest, I haven't the slightest clue what it will be about.
But I visited Zaphod to celebrate his birthday and he told me some of his dreams, some of his thoughts, and some things that aren't the revolution itself, but connected to it.
He told and told and I saw something I rate high in human beings...I saw passion and love for what he's doing, spiced with that little amount of madness, which is absolutely necessary to bring dreams into reality.
I saw a man who knows what he's doing, and who loves every little bit of it. And without knowing where this journey would lead me to, I decided to make it.
I told him, I want to be part of this thing, because it moves the people and because your little clues and talk catch me, make me believe in you and your project.

That's why I am writing this today, a friend asked to share his dream, and so I do.

I don't ask you to join, for I love anarchy and never would, but I share my thoughts and maybe some of you get interested.

I did a lot of public work during my studies, I spoke for the students, I organized demonstrations and marched through the streets to protest.
I helped projects come into live, worked with students, professors and politicians alike.
I knew many people who talked, but didn't do.
I knew many people who acted queer or had fantastic ideas, but proved to success with them.
I think after all the years, I developed some abilities to know, what kind of someone is and I am pretty sure Big Z is an good example for the second kind of people.

And after all, he has some real talented guys around him. Derwish, a master of our hobby, works with him, people like Camelson share his message. Award winners, other bloggers with lovely work, who thinks
they would invest their time and risk their good reputations for a big bubble of air?
I am pretty sure they are building a damn massive basement right now and when it comes to the walls and details, hey, that's my job anyway :)

So we know nothing, except their are some big names forging something big in the shadows.
For me, thats enough to ignite my fantasy and dream a bit while finishing my new general.


If you didn't here about the revolution yet, you might or might not click this to get directed to it: 
revolutionary link

Have a great evening my friends, I'll work the whole night, trying to finish my big draft for university...I really hate deadlines.


Montag, 3. Dezember 2012

Nurgle Blight Drone Schritt für Schritt - deutsche Version

Willkommen zum nächsten Step by Step Artikel!
Diesmal dreht sich alles um die Nurgle Blight Drone von Forgeworld.
Euch wird auffallen, dass es in den ersten Bildern noch einen Sockel gab, der später durch ein normales Spielbase ersetzt wurde.
Die Richtung des Projekts hat sich ungefähr zur Halbzeit noch einmal gedreht und statt einer Vitrinenarbeit wird sie meine neue Armee tatkräftig unterstützen.
Um das Base geht es in diesem Artikel nicht, da ich da noch auf Materialien warte.
Da es sich am Ende doch um eine Spielfigur handelt, gibt es natürlich einige Bereiche, in denen wesentlich mehr gegangen wäre, aber einfach ein paar Zwischenschritte mehr einlegen schafft hier Abhilfe beim ambitionierten Nachpinseln.


Wie gewohnt beginnen wir mit der Liste der benötigten Materialien:
Games Workshop :
Castellan Green
Incubbi Darkness
Abbadon Black
Flash Git Yellow
White Scar
Nurgling Green
Slanesh Grey
Deamonette Hide
Sreaming Scull

Brass Scorpion
Screaming Bell

Vallejo :
Dark Sea Blue
Silver

Tamyia :
Clear Green
Clear Yellow
Clear Blue
Tamyia Thinner XV-20A

Ölfarbe:
Gebrannte Umbra
White Spirit

Ard'Coat Glanzlack
Lamyian Medium Mattlack

Maskierband

Teil 1 - Die Rüstung

Alles wurde mit Zweikomponentengrundierung vorbereitet, also zuerst alles schwarz sprühen und dann
mit Weiß von schräg oben aufnebeln.
Hat zum einen den Vorteil, dass es unsere spätere Verlaufsarbeit vorbereitet und die Farbe wird besser haften.

Als nächstes maskieren wir alle Bereiche, die nicht zur Rüstung gehören. Die Tamyia Clear Farben werden eine sehr glatte und rutschige Oberfläche bewirken und wie ich auf die harte Tour lernen musste malt es sich dort später gar nicht gut.
Ich habe Maskierband von Tamyia genommen, normales Malerkrepp tut es jedoch auch. Dann aber ein paar mal auf irgendeiner Oberfläche aufkleben und abziehen, damit es nicht mehr so stark klebt und unsere Farbe nicht behält.
Nun beginnt die Arbeit für unsere Airbrush. Ich nutze wenig Druck (ungefähr ein Bar) .
Die Farben werden in kleinen Schnapsbechern verdünnt um zu verhindern, dass Farbflocken aus der Dose uns die Düse verstopfen.
Die GW Farben lassen sich nur mit dem Tamyia Verdünner richtig sprühen.
Tragt am besten Atemschutz und lüftet gut, dass Zeug hats in großen Mengen in sich!
Die GW Farben werden etwa in einem Verhältnis ein Teil Farbe und 6 Teile Verdünner verdünnt, aber ich nehm das persönlich nie so genau.
Die Clears benötigen kaum Verdünnung.

Wir beginnen mit Castellan Green. Große Bereiche werden gesprüht, in denen später die Schatten liegen werden. Arbeitet mit sehr dünnen Schichten, immer wieder bis der Verlauf weich ist.
Ziel ist keine deckende, sondern viele sich überlappende transparente Schichten um einen natürlichen Verlauf zu erzeugen.
Ich sprühe die unteren Bereiche und die Fugen der Panzerplatten.


Für den nächsten Schritt mischen wir etwas Incubbi Darkness in die Farbe. Wiederum mehrere transparente Schichten um die Schatten zu verstärken. (Dran denken mit jeder neuen Schattenstufe kleinere Bereiche abzudecken!)
Um die Schatten abzuschließen wird etwas Abbadon Black zugemischt.
Das könnt ihr so lange wiederholen, bis euch die Schatten dunkel genug sind. Ich habe noch zwei weitere dunklere Töne benutzt.


Zeit etwas Licht ins Dunkel zu bringen! In reines Castellan Green mischen wir etwas Flash Git Yellow.
Seid dabei vorsichtig, denn das Gelb hat eine sehr starke Auswirkung auf den Grünton!
Es ist wichtig, dass die erste Schicht noch nicht zu hell oder deckend ist.
Wir sprühen grob dahin, wo in den oberen Bildern noch weiß durchscheint. Dadurch, dass wir sie weiß gelassen haben, haben wir einen hellen Untergrund auf dem aufgetragene Farbe hell und glänzend wirken wird. Wäre alles in Castellan Green gesprüht worden, bräuchten wir hier wesentlich mehr Schichten!
abschließend sprühe ich noch eine dünne Schicht überlappend auf Licht und Schatten um den Verlauf weicher zu machen.


Der Verlauf braucht mehr Kontrast um auf Entfernung zu wirken (bei Spielminis extrem wichtig) und darum mischen wir immer mehr Flash Git Yellow bei.
Wie schon beim Schatten, kleiner werdende Bereiche mit transparenten Schichten bearbeiten.


Für die letzten Lichter mischte mehr Flash Git Yellow ins Grundgemisch und fügte ein wenig White Scar hinzu. Heraus kommt ein sehr heller, leuchtender Farbton.


Damit ist die Grundlage fertig. Lasst uns den glänzenden/schleimigen/demönischen Look herbeizaubern.
Drei Schichten Ardcoat werden aufgesprüht, um eine glänzende Oberfläche zu erreichen und den Effekt der Clears zu verstärken.


Diese Farben sind genial. Auf eine weiße Oberfläche aufgetragen, werden sie sie einfärben und umso mehr Schichten wir auftragen, umso stärker werden Farbton und Glanz.
Außerdem kann man sie auf fertig bemalten Oberflächen einsetzen um zb Schattenbereichen mehr Tiefe zu geben oder Farbnuancen zu variieren.
Das ist ein weiterer Grund für die weißen Stellen, hier wird das Clear stärker wirken, als auf den Bereichen, die Grundfarbe und Schatten abbekommen haben.
Leider gabs hier technische Probleme und ein paar Bilder fehlen, daher eine kurze Beschreibung, was ich mit den Clears angestellt habe:
Zwei Schichten Clear Green auf die ganze Panzerung um alles grüner zu machen und Glanz aufzubauen.
Da das den gelblichen Ton der Lichter etwas dämpfte (und mir der ziemlich gefiel) kam nur auf die Lichtbereiche ein paar Schichten Clear Yellow.
In die Schattenbereiche sprühte ich etwas Clear Blue.


Abschließend eine Schicht Glanzlack auf alles um die Farbe zu schützen und nochmehr Glanz zu bekommen.
Danach entfernen wir das Maskierband.

Teil Zwei - Die Haut

Die Grundfarbe ist Nurgling Green, sie wird nass aufgetragen und mit Slanesh Grey (unverdünnt) werden direkt auf diese nasse Farbe die Schatten gemalt und alles wird, wie auf einer Palette, verblendet.


 Hier ist es wichtig kleine abgegrenzte Bereiche zu bemalen, damit die Grundfarbe nicht trocken ist, bevor wir fertig sind.


Nun verstärken dünne Schichten Slanesh Grey die Schatten.


Auf immer kleinere Bereiche tragen wir die mit Deamonette Hide abgedunkelte Schattenfarbe auf.


Für die letzten Schatten wurde Dark Sea Blue in die Mischung gegeben.
Die Lichter wurden genauso gemalt, hier nutzte ich Mischungen aus Nurgling Green und Screaming Skull.


Einge der verroteten Stellen bemalte ich mit Lamenters Yellow, was am Ende aber keinen großen Unterschied machte.
Da ich in so ungefähr 10 Jahren auch mal eine Armee fertig haben möchte, arbeitete ich die Bereiche nicht bis zum Maximum aus. Die Rüstung hat viel Aufmerksamkeit bekommen, sieht super aus und wird sowieso der Blickfang, da ist es gerade bei Spielminis ok, Kompromisse in anderen Bereichen einzugehen, solang man selbst das Resultat mag!
Nun habe ich großzügig verdünnte gebrannte Umbra auf den Hautbereichen verteilt und antrocknen lassen.
Nach dem Trocknen wird der größte Teil mit White Spirit und sauberem Pinsel wieder entfernt.
Am Ende betont die Ölfarbe hauptsächlich die Falten, Schatten und zieht als ganz dünner Filter alles mehr zusammen.


Teil 3 - Glitzerkrams

Und wieder, verlorene Bilder nach dem letzten Rechnerzusammenbruch. Daher hauptsächlich Resultate zeigen und erklären, aber ich denke die Bilder zeigens ganz gut.
Alle Metallteile wurden mit Brass Scorpion bemalt. Danach folgte bei zufälligen Teilen eine Schicht Sreaming Bell um das ganze nicht zu eintönig werden zu lassen.
Das Screaming Bell sorgt für den roten Metallton (in den ich mich sofort verliebt habe)
Silver wurde zugemischt um die hellen Bereiche zu malen, während immer mehr Abbadon Black in der Grundfarbe für die Schatten sorgte.


Alles Metall wurde so bemalt. Die Linse bekam eine Grundschicht Dark Flesh, aufgehellt mit Screaming Scull. Dazu trug ich jedes mal eine hellere kleinere Schicht auf und lasierte alles mit stark verdünntem Dark Flesh, das ungefähr 8 mal. Dadurch wird der Verlauf sehr schick. Glanzlack rauf, fertig auch das.

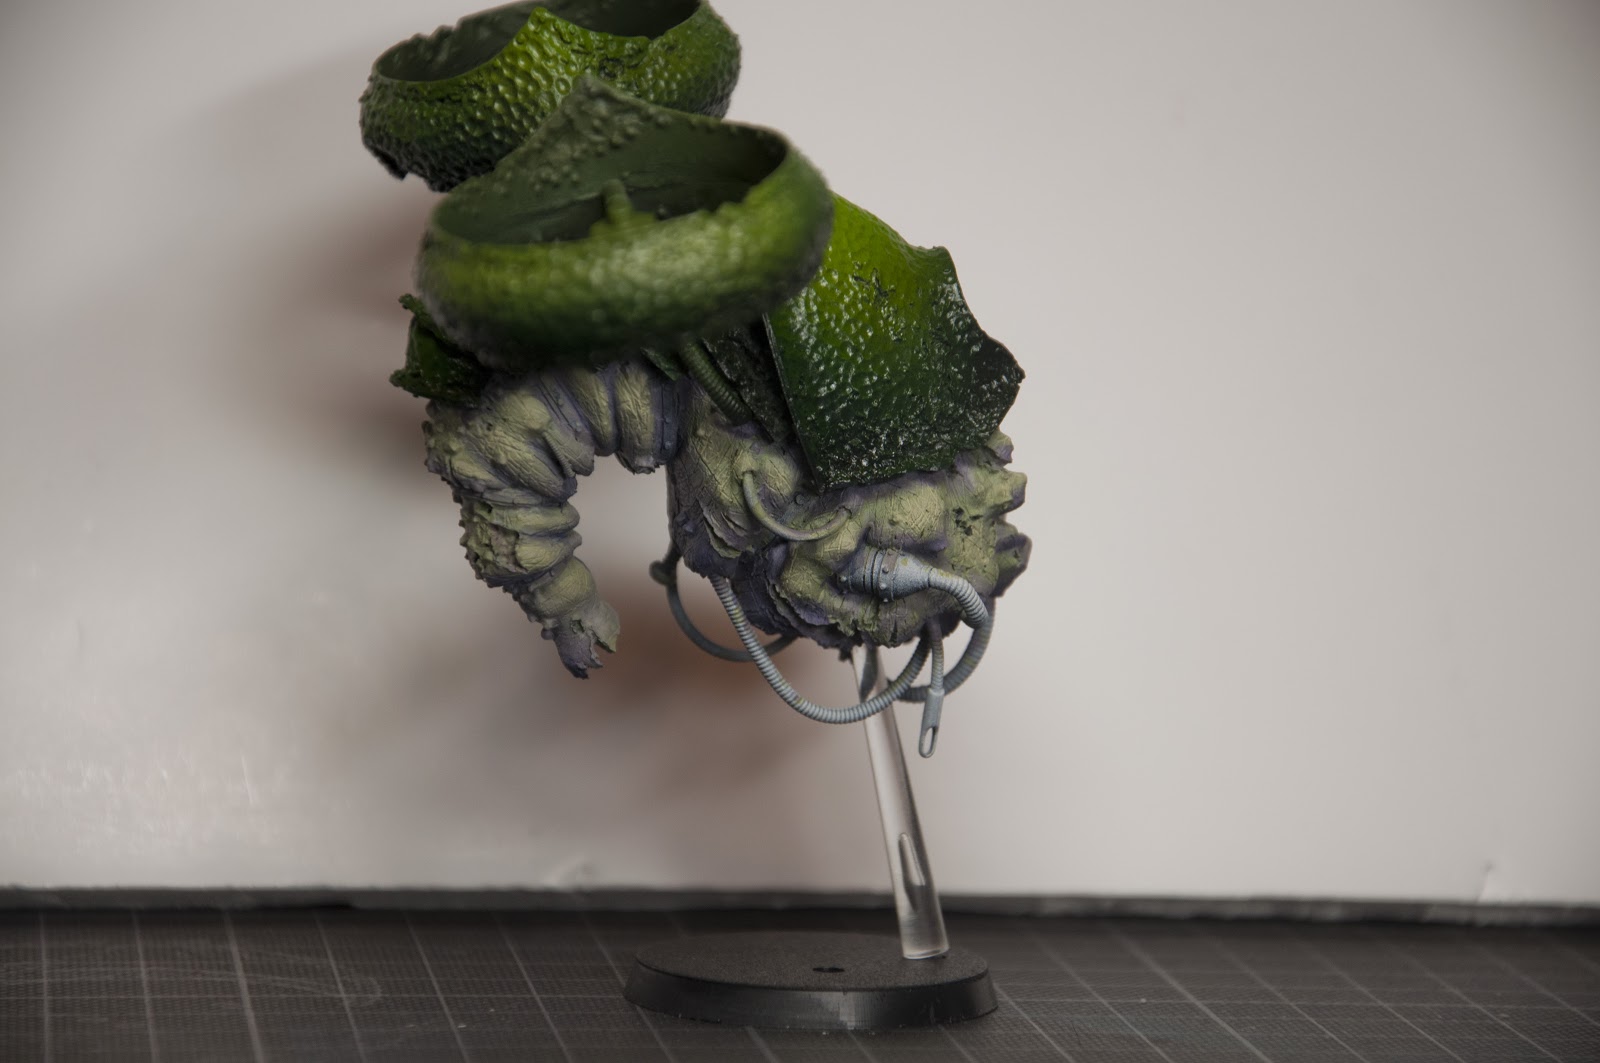
Teil 4 - Das Ergebnis

Schaun wir uns den Brummer mal fertig an...


An manchen Stellen recht kurze Erläuterungen, aber das Hauptaugenmerk lag diesmal auf dem dämonischen Metall. Zu Haut malen, Ölfarben und den anderen, kürzeren Themen findet ihr tonnenweise gute Tutorials im Netz und bald auch hier wieder mehr.
Ich hoffe einigen etwas neues gezeigt zu haben und vlt hats ja den einen oder anderen inspiriert ;)

Grüße Martin