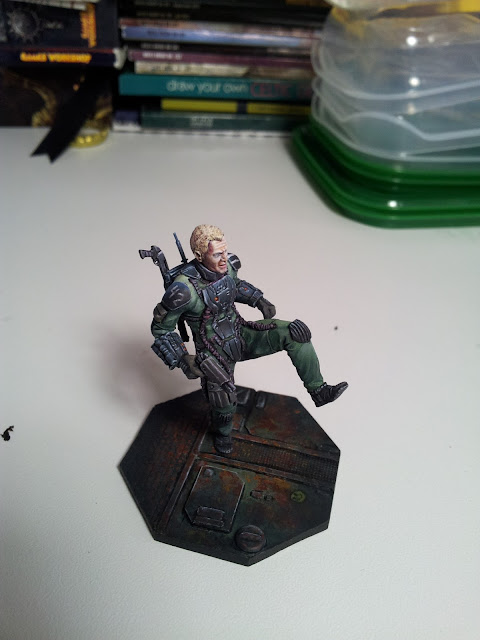
On sunday I finally finished the soldier mini. It took me longer than I planed due to that I only painted at the weekends. But after my birthday party on the weekend I think I will paint more often again.
So when I thought about how to paint the base for the mini, I thought you might want to see a step by step.
First I lavishly poured some dilluted red, yellow, browntones over the base. I also held the brush over the base and hit with the finger on the brush so that drops of paint fell on the base. I let it dry overnight. The more leveled the base is positioned on the table, the less the colour flows into a direction and stays where it is. Sunday morning I did the same thing again, because I wasn't satisfied with the result from saturday, the base wasn't standing leveled enough.
Base freshly painted and wet, wet, wet.
Base on sunday morning.
And again, flooded with paint and dried.
Afterwards I've dabbed some maskol with a sponge (not named Bob) on to it to achieve a chipping effect later on.
Now I painted red over the whole base and also again some maskol.
Yellow and afterwards maskol.
Some red brown and maskol, but I forgot to take a picture. So next is Scorched brown and maskol.
And finally the colours the base should have had originally, before it got rusted as hell.
As you can see the maskol already is really thick on the base. I think I've put too much maskol on the base and also did it in too many layers. Some of the thinner applied maskol dips stayed on the base due to that they were covered by too many layers of paint. Maybe an airbush will help with that...I'll see in the distant future...ah yeah I used my fingers and the brush you see on the photo above to rub the maskol off the base. It's got hard and short bristles.
Here's the base with the maskol rubbed off
And here the finished mini and base
So for the base I just painted shadows into the direction of the base borders with dark sea blue and black to get a spotlight where the mini is standing. Also some lights on the edges and some outlininininining. That's it.
Well because my 30th birthday party will be on the weekend I'll have much to prepare. There'll be japanish food, arabian food, turkish food, indian food, australian food and italian food on a buffet for my guests, all prepared by me, and me alone...hope it will taste good, I mean it doesn't have to taste like it's supposed to taste as long as it tastes good. This means no posts from me till next week.
Have a nice day!


First off.. happy birthday coming up! Hope the buffet goes well.
AntwortenLöschenSecond, the manner in which the base came out is great. I will use this tutorial for my Sedition war bases I think as it gives the vibe I am looking for exactly! Thanks for it!
Happy Bday!
AntwortenLöschenNice work on that base.
I don't think yo overdid it. After taking the Maskol off it was really good looking. But what you did afterwards with the black and the depe blue. Man, no words can discribe.. Looks GORGEOUS!
Thanks for the comments and thanks for the congrats. What I forgot to write is, that before shading it, I painted here and there some of the colour the base should have had originally to cover some of the rust, where I thought it was too much. But I'm happy that you like it!
AntwortenLöschen