Hello my friends, it is tutorial week!
I am proud to present you what is the biggest tutorial I made so far.
I sprayed, painted, sponged and painted again, took tons of photos, edited
them and wrote through the nights. And for the first time (because there were
many who wished I would do that...) the tutorial will be bilingual! This
tutorial is available in English and German language.
To find the German version just click here:
Klick mich!
And now lets begin!
They are the centerpieces of many armies, their weapons are the most deadly
around, their speed is the base of many tactics and they tower over every
infantry model...TANKS!
Nearly every tabletop general comes to a point, when he wants to own one or
more tanks and crush his enemies with them.
But painting such a monster can be a very intimidating task, painting lots
of them even more.
Besides showcase painting, I still love to play from time to time and my well
known love for vehicles forces me to include them into my armies every time
:)
I made a lot experiences during my years of showcase painting and last time I
decided to paint a new army, I tried to use them, of cause in a way simpler
variant. So I tried around, painted some vehicles with the goal to be as fast as
lightning without them looking loveless made. You can find some of my test
objects here:
Ork
Burna Bommer ,
chimera
transport tank
Of cause not many people have the time and motivation to put 20 hours into a
vehicle, that might explode in the first round, but who doesn't love playing
with awesome looking models?
So I want to show you how you can paint exactly that awesome models with
tolerable time effort.
Every article will show you an aspect of my working process, explaining
everything with pictures and explanations, showing the world of "vehicle
speed-painting".
Of cause this is just one of countless ways to do the job, maybe it is one
you like :)
3 Leman Russ Battle Tanks will be painted for this article.
After this series is finished, they will be available at ebay, so if you fall
in love with one or all of them and want to own them, you'll have a chance
;)
Part 1 - The assembly
There are a few essential keys to safe time and be effective while
working.
First of all: Know what you do, know the model and how it works.
I studied the instructions of the tank kits (a thing I never do when having
time and painting for showcase, because I feel somehow limited then), and
thought which parts should be painted separate. I also decided which parts I
would clean of mold lines together.
I pinned them on my wall, so they wouldn't fly around my painting table.
The second key is assembly line work.
This concept dates back till the 15th century and works very well.
We know we want to build 3 tanks, and we know there are steps we have to do 3
times. Cleaning, gluing, priming, spraying our first colour, our second...you
know what I mean.
So I cut the same piece from every sprue, clean it, take the next and so on.
While doing so, you fall into a mindless mode of repeating steps, but you get
faster and faster. My first tracks took minutes to be cleaned, after the 10th it
was faster and the last tracks were done in no time.
You just know how to handle every part of your kit, a thing that doesn't
happen when you build a full tank and then the next.
Be sure to have some music or a friend to talk with while doing this, because
it can get really boring.
However, the saved time is worth it.
Three sprues,
ready to work with. Be sure there are just the sprues you work with currently,
to avoid a mess and chaos.
I'll show you the tools
I used, and what I did with them:
1: A triangle, if you
not want to add some scratch-built details, like new lines of rivets and such,
you won't need it. I used it to measure, and a steel variant to cut and draw the
rivet lines.
2: A brush to clean
away the dust and little plastic parts, that always appear while cleaning mold
lines and drilling plastic.
3: A few clamps to hold
fresh glued parts in space.
4: Just a different
sort of clamps, to hold plasticard sheets in place while cutting them (really
helpful for small plates)
5: The good old wire
cutter, to get the bits out of there sprue.
6: A Drill for weapon
muzzles and wholes.
7: A scalpel to clean
the mold lines. Be sure you use a new one, for a sharp one will safe time and
energy!
8: Rubber bands to hold
big things in place when glued.
9: Multitool for
drilling, sanding and grinding.
Some tools are not
necessary, but nice to have.
A few impressions of my
personal assembly line work:
All sides of our
tanks are ready before anything is glued.
They all want to
be cleaned...
...and when you
did that and have everything in order it feels damn good.
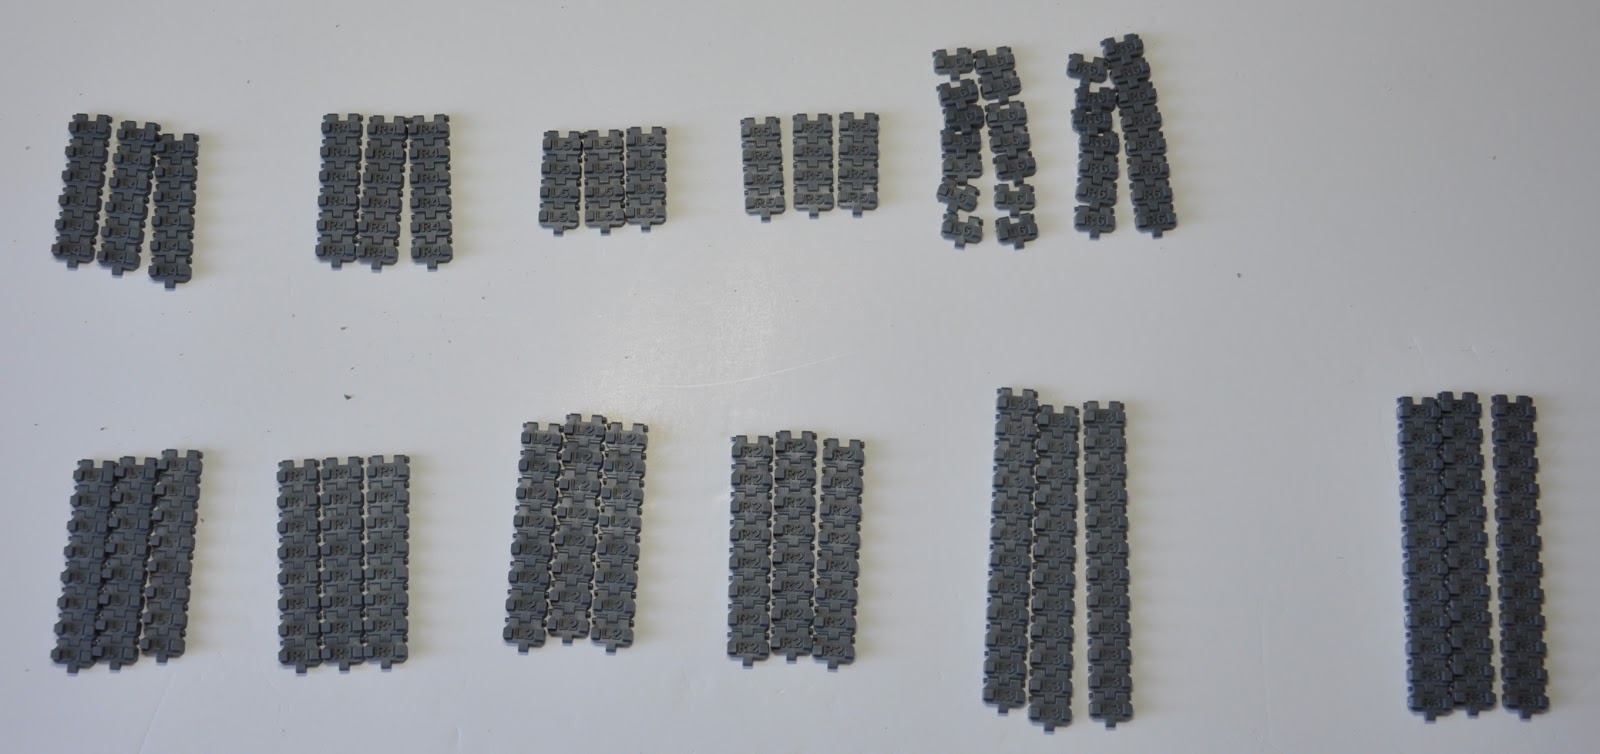
Of cause assembly
line work doesn't mean we take every track part from every sprue, than the
next...no, we know that all track parts are basically the same thing and we'll
have to do the same to them. So we take them all out and clean them. They are
numbered in this kit, so organizing them was no problem. Thats the concept,
choosing groups of bits that will require the same handling and saving time with
them.
I also glue same
parts together at the same time.
I don't think
it is necessary to show more of the building process, for everyone of us did
this with a miniature.
Converting your tanks
is the best way to double the time you need, a thing many gamers can't effort
(either for time it needs or materials used) but we don't have to abandon
it!
Squadrons often have a
leading vehicle (if not in rules, for sure in their background) and investing a
little time in making this one special is an easy way to have something personal
in the end.
I decided to add some
battle damage and a new plate with self made rivets, a banner (yes, cool tanks
have cool banners...at least I think they should ;) ) and a vox unit from GW's
command vehicle sprue.
The battle damage:
Be very careful where
you put your damage, they look silly, if too much or in the wrong places. Also
later paintwork is effected by their position!
I always sketch
out my damage, all of it before doing something, so I can check the look of
it.
I sanded the
plastic down to a very thin level, using my multitool. Always think of your
safety while using such a thing, it is possible that something shoots through
your room with enough speed to hurt you.
Never forget your
safety, without your eyes, painting can be very hard so you should protect them
;)
To check if
your plastic is thin enough, hold it against a lamp. If you see the light
shining through, it is just right.
Take your scalpel and cut into the thin plastic, bending and twisting it to
simulate thinned metal, that rusted, was shot, etc.
Be sure you prime
the inside of your tank side before gluing. You will see the inside through our
new made hole and spray primer won't reach it afterwards!
Adding new armour
parts:
I used a rivet maker by
the company Trumpeter and a thin brass sheet. Using the tool is simple, it
presses into the material with its teeth, you just press it against the sheet
and draw a line where the rivets shall be.
You can also use thin plasticard instead of brass. When you like the look of
your plate, just glue it in place.
This is an experiment, as I just got my hands onto this awesome tool. We'll
see, how much the rivets will stand out in the end. If they are not strong
enough, we at least added a new layer to the back of our hull.
That were todays thoughts about the assembly, nothing new to the world, but
things one should have in mind when the goal is time effective working.
Part Two - The basic color
I made a lot of pictures and then realized, it wouldn't be enough to explain
everything. So I choose to make a big testing card again, showing you the
different stages of the weathering process and the tools I used.
I'll first explain everything with that "dummy" and than move on to the
tanks.
Let's start with our materials again:
1: Hairspray
2: Salt. For our gaming model, the normal salt you're cooking with is fine.
To add more realism you can also use different sizes of salt grains
3: Purity Seal ( a varnish). Every other brand will work to I guess.
4: Revell Airbrush Cleaner
5: Tamiya X-20A Thinner. This is the only stuff I know, that will thin your
Games Workshop colors without clogging your airbrush. (most people out there use
the citadel colors) The awesomeness of that stuff was discovered by my friend
Zaphod Beeblebrox, check out his blog
masterminis !
6: Tamiya colors. I used them to make new experiences, and I am really happy
with them. It is hard to describe, but they are just right to airbrush.
7: An airbrush. I use the Gabbert Triplex (from a small German company), but
every double action airbrush will do the job.
8: Pipette, to measure the amounts of thinner, fill your airbrush with
cleaner, etc.
9: Scalpel...you'll see why :)
10: Stipple brush, just a very hard brush with very short bristles.
I forgot two things in my picture, tooth picks and little shot glasses, to
mix the color.
A few thoughts to airbrushing:
I use low pressure (around one bar) and very thin color (one part color,
six parts thinner).
Don't forget to spray some cleaner from time to time, and you can spray
for hours without problems. The Tamiya paint is really friendly to lazy artists
:)
Todays colors are:
Chaos Black for priming, Tamiya XF-9 Hull Red for the rust tones, XF-4 Yellow
Green to mix our highlight color and XF-13 J.A. Green as basic green.
I used an old sheet of plasticard for our exercise. It was primed black, then
simply airbrushed with Tamiya XF- 9 Hull Red. (Someone told me, the F stands for
flat, so it has a matte finish).
The right part was sealed with Purity Seal, the left part not.
If you seal the color, the next steps won't effect it. You can be sure that
your basic rust color will remain as it is...no bad surprises. But as I forgot
the sealing on one of the dozer blades, it happened the result turned out really
nice and full of life...in the spots where the rust wasn't removed
completely...going on without sealing is gambling with the result.
Next I covered the whole thing with a heavy layer of hairspray. In the lower
areas, I added salt. The upper areas are for our other tools. Be sure the
hairspray is dry before applying further layers of paint. Again, you can ignore
this, the color will crumble and crackle, which looks damn awesome...but will be
gone after your first battle. Big potential for showcase painting I guess...
Now we cover the whole area with any color, I choose the green I am using at
the tanks. I sprayed several thin layers, and highlighted the middle of the
plate with a lighter version (mixed yellow in).
This has to be dry to the touch, but don't wait to long, as we need to remove
it...
...REMOVE IT??? Yes,
now comes the weathering part! We use some techniques, that will have more or
less random results, which adds realism to our paintjob.
We cover the whole
plate with steaming hot water. It has to be hot, so the salt will dissolve
better (and hot water can hold more salt than cold). This soaks in for a few
seconds.
WTF? My color
looks...different?
This is normal,
after drying, the really strong effect of lighter streaks will
disappear.
Now we use a brush (I
choose a soft big one, so I would remove the salt, but not to much flakes of
color) and brush the salt away. The water soaks through our green paint and
loosens it from the brown, because the hairspray prevents the two colors from
clinging together.
Small amounts of salt will give you small spots of rust, while big ones will
give holes in the green color layer.
With the stipple brush, we can create scratches, stains and so on. There are
different ways to use it, brushing in little circles, with different pressure or
scraping lines to create scratches.
Just play around and let the coincidence guide you on your first steps :)
(Being random can also be a little vacation from planned painting)
The toothpick creates big scratches, that have rusted under the surface for
quiet a time.
And the scalpel creates small scratches, really fresh.
So..I told about not sealing...here is the comparison between the
results.
You can see that the brown color is dissolved by the hot water where we
didn't seal it. The water itself becomes brown and while removing it from the
plate that brown pigments spread around...can be quite a mess. But, if you are
careful, you have a mixed rusted area, with tones of brown and black, way cooler
but very random.
This is the effect if
the hairspray wasn't really dry...or you use too much water, I really don't know
which of both fails is to blame^^ It looks awesome, but I think it isn't solid
enough for gaming...
You can check out the different effects after I tried around a bit.
You'll notice there are some bright, yellowish spots, some even white..I
really didn't know how to avoid them, until I found a way to fix that problem.
After applying a coat of Purity Seal, the effect was gone.
You may also notice that the overall look has slightly changed. The varnish
blends everything together on the coast of some contrast, but knowing this, you
can use higher contrast in the first place, to achieve the right degree in the
end.
The lower part, where every technique is used and everything comes together,
looks really nice in my opinion.
If you are interested in the hairspray technique and weathering and want to
know more, check out this links:
MV
Weathering Tutorial Part 1
MV
Weathering Tutorial Part 2
MV
Weathering Tutorial Part 3
MV
Weathering Tutorial Part 4
Raffa aka Picster did a great job on those VIDEO TUTORIALS, over at Massive
Voodoo. Thanks my friend for allowing me to link your stuff up :)
I'll show you progress pictures of the tanks now, most of the explanation has
been done, enjoy and see what can be done :)
The dozer blades
are the most damaged parts, tons of rubble and nasty explosions damage the paint
of our tanks and rust will spread. So we add the most salt there, and all
techniques are used excessive.
The highlights are
sprayed in the middle areas. I used two versions of the green, each with a
little bit more yellow in it to create some depth.
Different degrees of rust add live to a squadron. Some vehicles are older,
some crews are first to pass a clogged street first all the times. Don't worry
about that yellowish stains, the Purity Seal will let them vanish...
and thats the
finished green on our dozer blades.
I try to keep the shades, so I just spray very little or no color to
recesses. Again, the middle of every plate receives the most
paint.
It can be very useful to attach your parts to some socket, so you don't
have to touch the paint. Without sealing it the paint removes easy, and we don't
want to have fingerprints and all the green at our hands.
Edges are areas, where the paint will be gone very soon after the tank
left the factory. You can use your brush, or a scalpel to wipe the green paint
of. (Be careful with the scalpel, to much pressure and you see plastic)
The turrets after sealing...
Some closeup to show what I mean with middle areas. The recesses and
shadow areas received less color then the middle, where most light would
hit.
We use the salt most in the lower areas, where rubble will damage the
paint.
The contrast
between light and shadow areas after two highlight colors.
We can ignore the yellowish spots, but where we see pure white, we have to
clean again. Use hot water, again and again until no white spots are left. The
puirty Seal won't cover them!
...so that all looks quite messy. Now lets have a look on the final results
after sealing with Purity Seal.
And the yellowish
spots are gone :)
I think they look
impressive already...
And don't forget to take a break from time to
time, or else such a project drives you mad ;)
Part 3 - The camo
Todays colors are Tamiya XF-57 Buff (the beige basis tone) and Tamyia XF-2
Flat White (to mix the highlight color)
Again, we start with our nice friend, the testing card. He will accompany us
till the end of the article :)
We also need our scalpel and some kind of masking tape.
I cut my camo pattern while the tape is glued to my cutting map, so it looses
some of his stickiness (this prevents the tape from ripping our basic color off,
where the priming wasn't perfect)
I cut a pattern I used a lot of times, so I am used to it and know, what I am
doing. If you never did such a thing before, just look at some pictures from
real tanks, artbooks and codizes. The Imperial Armour Books also provide a wide
range of camo patterns.
Again we use hairspray and salt...now comes the very important part, that
will add realism to the job.
We sprinkle the salt in the places, where our basic color is already damaged.
This will blend the two colors together, preventing hard cuts where rust should
be. This is also the point to cover mistakes, by simply not adding salt and
hiding them forever ;)
Of cause, we also sprinkle salt where no rust is, to show the second color
was damaged, but the first hasn't been yet.
Now just repeat yesterdays steps. It is a good idea to remove the tape after
washing the salt away! There are tiny flakes of white flying around and we avoid
them sticking to our green.
And never...I really mean NEVER use the water tap...it rips and tears the
color away.
And thats how it looks after removing the tape.
Thats nice but...well its not right yet.
Now we use our stipple brush, our toothpick and our scalpel. Scrape the camo
away where big spots of rust are, scratches that hide under the camo we just
renew. With a little patience, we create a good looking weathering, way faster
than by painting everything with the brush.
Better, isn't it?
Now let's do that stuff on one of our tanks ;)
We'll start with the dozer blade.
The stipple brush
is very useful to stick the tape to edges.
You can see how I
protect the rusted areas with salt.
A few pictures of the covered tank:
You may notice there isn't much new today, but it's really just yesterdays
techniques used again and if you use them more often, it becomes easier and
faster :)
Don't be scared of the end result,don't have thoughts like that is just stuff
cabinet painters do. To tell the truth, is really simple and absolutely no
magic. Take a few test models or sheets of plasticard and practice and you will
reach this level ;)
No let's have a look on todays result:
Part 4 - Painting the tracks
First, there is a golden rule I forgot, you might remember from the first
article:
ASSEMBLY LINE WORK
Yes, I also do this stuff while painting. Spray all dozer blades, all
turrets, all hulls. This allows me to mix great amounts of color without wasting
them.
And again, the not thinking just doing mode!
I cut all the camo before applying it to one tank:
This will fasten up your progress.
The tracks where masked with tape again.
No we spray GW
Leadbelcher, thinned with Tamyia Thinner. (This stuff is awesome, also when
painting with the brush.)
Take a sheet of
paper to protect the untaped ares.
Two layers of GW
Seraphim Sepia add depth and color to our tracks. It's not the best method
around, but it's damn fast.
And to close todays
post, the squadron all together in actual status:
Part 5 - Decals, Oil and pigment
The last days were a hard road to walk, my illness made work unpleasant and
my camera had a problem with the software...some pictures of the wip process
were lost and some private stuff kept my mind busy.
I'll try my best to explain the things I did the best I can, using the
pictures that survived.
First I painted all the sponson weapons,search lights and smoke
launchers using the known techniques.
I used an nearly empty roll of double sided tape to hold them all
together.
Tape Wheel of
Doom...
I primed everything with chaos black spray, airbrushed a basic color of Hull
Red and a layer oh hairspray.
And now the first pics are missing. The next step is to cover everything in
green (we don't need salt on those little bitz). Then the stipple brush creates
rusted edges and little spots of rust, releasing the paint with hot water.
The metal parts of the tank and weapons were painted with GW Lead Belcher and
then washed with GW Seraphim Sepia (like the tracks).
The search lights were taped and and airbrushed with chaos black. Then I
added very thin layers of blue tones, beginning with regal blue up to a mix of
regal and ice blue. every layer covers a smaller area. Then everything is
covered with Gw Ard'Coat. (gloss coat)
The next step was to add some decals. I used the imperial tank sheet and the
cadian troops sheet.
Cut out the decal you want to use. There are plenty ways to use them, here is
mine.
I lay the decal on
a finger, wet it with a small brush until it moves around on its paper.
Then I just take
it with the brush, put it into place with a great amount of water to move it
there, until it fits. Then take a dry brush and take the water away. It is
important not to touch the decal itself, cause it can move while being
touched.
I used numbers to add a feeling of ranks in the squadron and symbols and
writings to add life.
Now I use two layers of GW Lamyian Medium to seal the decal.
After this is dry, I use the scalpel to scratch little parts away and create
a realistic appearance.
before
after
If you don't seal your decal, the scalpel will just rip away
everything.
After scraping, add another two layers of Lamyian Medium.
Then the final touches with oil colors come.
Here is what we need:
White Spirit to thin the oil color, burnt umber to create rust streaks and
dirt and a brush you should never use again with your acrylics ;)
Everything that is waterproof will do as palette, I use a packing part, but
also own a big wooden palette and painted on cigarette packages when traveling
around. It really doesn't matter.
I use very thinned color
Cover everything with a heavy wash of oil.
Use a clean brush and white spirit to remove the oil color, where you don't
want it. You can work with it for hours. vertical brush strokes will create
streaks of rust.
The oil will change the overall color and effect, depending on your basic
color and the varnish you used.
I couldn't find out yet, when the oil color will disappear without impact on
the paint job and when it will work as filter, I just do and make the best of
it. No mistakes, just happy accidents ;)
I wipe off most of the paint in flat areas, leaving a touch of it (just a
thin shade) at the edges and a little stain here and there. Just try it, you
will get the hang really fast.
I use tons of white spirit right on the model, removing it (with color
dissolved) with a clean brush ( I clean him out on a paper towel, so he gets
dry) or pushing the liquid into the recesses to shade them.
I let the color dry for about 20 minutes before starting the removing
process. This will allow the color that gathers around rivets and in the recess
lines to stick to that areas, when the white spirit hits the model.
Then I start to clean the areas up
And another picture to show the difference between oiled areas and the
rest
After this is dry to the touch, I add black weathering powder to the exhausts
and gun muzzles. No pics of this, but you simply take a dry brush and add the
powder to the model.
This was the final step, everything was covered with two layers of Lamyian
Medium afterwards.
I didn't finish the banner, but I think the squadron looks nice without
it.
Now here are the final results.
Beware, many pics ;)
I had a lot of fun
with these babies and I really hope you learned something of use for you.
If you try out some of
this, I would be happy if you would show me the results :)
In the end, the whole
squadron took between 10 and 15 hours, but the greatest part was article
writing, taking a lot of photos till they were right and editing them. I think
the goal of being fast with a nice result was reached.
Here are the
Cmon-Links:
Tank 3
Whole Squadron
And of cause, the
Ebay-Links:
I wish you all good
night, I am gonna recover a few days now :)