Mittwoch, 27. Februar 2013

Painting a rusty base Step by Step and Mini Done

Hussar!

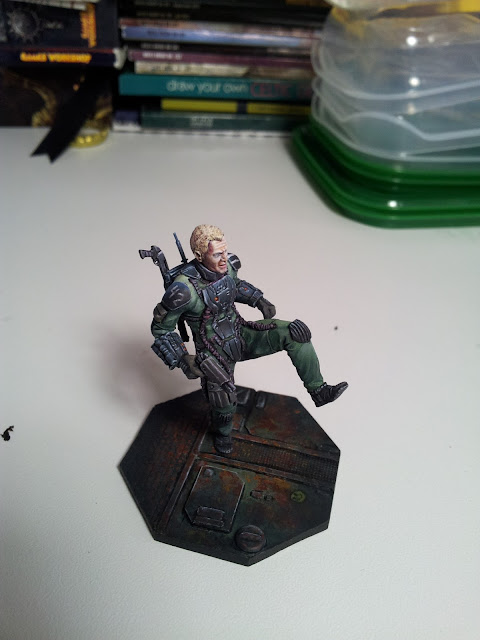
On sunday I finally finished the soldier mini. It took me longer than I planed due to that I only painted at the weekends. But after my birthday party on the weekend I think I will paint more often again.

So when I thought about how to paint the base for the mini, I thought you might want to see a step by step.

First I lavishly poured some dilluted red, yellow, browntones  over the base. I also held the brush over the base and hit with the finger on the brush so that drops of paint fell on the base. I let it dry overnight. The more leveled the base is positioned on the table, the less the colour flows into a direction and stays where it is. Sunday morning I did the same thing again, because I wasn't satisfied with the result from saturday, the base wasn't standing leveled enough.


Base freshly painted and wet, wet, wet.


Base on sunday morning.


And again, flooded with paint and dried.

Afterwards I've dabbed some maskol with a sponge (not named Bob) on to it to achieve a chipping effect later on.


Now I painted red over the whole base and also again some maskol.


Yellow and afterwards maskol.


Some red brown and maskol, but I forgot to take a picture. So next is Scorched brown and maskol.


And finally the colours the base should  have had originally, before it got rusted as hell.


As you can see the maskol already is really thick on the base. I think I've put too much maskol on the base and also did it in too many layers. Some of the thinner applied maskol dips stayed on the base due to that they were covered by too many layers of paint. Maybe an airbush will help with that...I'll see in the distant future...ah yeah I used my fingers and the brush you see on the photo above to rub the maskol off the base. It's got hard and short bristles.

Here's the base with the maskol rubbed off


And here the finished mini and base


So for the base I just painted shadows into the direction of the base borders with dark sea blue and black to get a spotlight where the mini is standing. Also some lights on the edges and some outlininininining. That's it.


Well because my 30th birthday party will be on the weekend I'll have much to prepare. There'll be japanish food, arabian food, turkish food, indian food, australian food and italian food on a buffet for my guests, all prepared by me, and me alone...hope it will taste good, I mean it doesn't have to taste like it's supposed to taste as long as it tastes good. This means no posts from me till next week.

Have a nice day!


Samstag, 23. Februar 2013

Booooooooooonnnneeeessssssss and stuff

Hello again,

sorry for my late reply. I've been really busy the last days. And my left toe is aching...yeah, yeah whatever...

Over on tutofig I found a link to a tutorial on Martas blog (http://twistedbrushes.blogspot.co.uk/2012/03/little-bones-for-basing.html) about real animal bones for basing. Hmmm realll boooonnnnesss yummieee!

Didn't find them on ebay, so I googled owl pellets and found some in a store, where  I would have had to order for 100 euro minimum...hmm...no thanks... I gave ebay a second chance and tried ebay.co.uk because on the blog it says Marta is living in london town. SUCCESS!! I found them under the name "wild barn owl pellets", 6 pieces for 5 euro cheap in comparison to the other store I found (were about 30 Euros for six pellets). The only thing was, that the cheap ones weren't steril...but I read on the internet that sterilizing them only means to treat them with boiling water.

So when they arrived I waited till the weekend for the mission "sterilization nation". As I am a little too careful/sissy-minded I've put on gloves, a papermask and safety goggles too open the package (couldn't tell before opening the package if they were just lying in there or safely packaged). They were securely packaged in there. And also there was a note which said "for sterilization put them in a freezer for at least 2 days". ABORT, ABORT, ABORT MISSION "STERILIZATION NATION" NOW!


So I've put them into a freezer and as I visited my parents the weekend after that I finished mission "sterilizaton nation" yesterday.


Again I've put on gloves, papermask and safety goggles.


 I opened the small package.


See how small the pallets are, the coin is a 2 euro coin. So as I said that I'm sissy-minded I cooked the pellets for ten minutes in stead of just spill some boiling water over them. It smelled like old socks or wet dog or dog breath, I'm not sure but I've smelled it before. But as I studied chemistry and worked at a company that does food analytics, I'm used to much worse smells.


Afterwards I tried to filter the water and as I didn't have filters I took kitchen paper...nahh didn't really work. So when I got rid of most of the water I started to pick up the bones with a tweezer and put them into a bowl with fresh mountain water....okay just water. I cleaned them by puring the water out and leaving the bones in and filling the bowl up with fresh water. Did that a couple of times until I spilled the bones over sheets of kitchen paper. Then again I put the bones into a bowl with fresh water and picked the bones up one by one with a tweezer and put them into another bowl to get rid of the last remaining "sand" or whatever it was. Done that I pured some airbrush cleaner over them and that's the way I left them until I'll use them.


See how weeeeee they are? Most of them are rip bones I think and they are thinner then every sculpted bone I've ever seen. One of the squares under the bowl is about 1cm.

I'm really looking forward to use them for my projects.

Ah and before I forget some WIP pictures (which are not up to date...sorry for that) and the gift I gave last weekend to a friend who became 30 years old. The thought was that when you turn thirty you need to give your arguments some serious backup...


(The sound effects and the light are awesome!)


So have a nice weekend and read you soonish!


Freitag, 8. Februar 2013

Study stuff, lifesign and cats

And here he is again.
No time for painting right now, but this will end very soon.
I'll write my last exam at Monday and then, finally, free time.
Ok, I'll have to work and such stuff but the kind of work that ends after 8 hours.
So expect some color soon.

This were the final renders for two projects, as always, just one night to make them all together...I really hate such tight deadlines. Anyways, they are ok for that time.


One of the flats in my main draft. I tried to create open, floating space, so all the families actions could take place in one big room, while private rooms are a special area.
Tons of thoughts went into it, maybe I'll write some of them down someday.


And a view from outside. We had to work in an area of historic preservation and it was quite a task to create something that would be allowed to be built there, without just faking to be an old house.
This thing drove me mad, cost countless nights without sleep and years of my life for sure.
But in the end, its quite a good feeling to be done with it. The harder the fight, the sweeter the victory I guess.


Now that was a damn quick one :) This was for a small project we had to do besides our main drafts, corporate building in Stockholm. Not to far into detail, we should work with energy concepts and different types of fronts to understand the principals we learned.


I am glad I can deal with miniatures again, its pretty impressive to work on pictures that measure more than an army display but you just see every damn mistake so quick.
Guess I'll be off Rendering and Photoshop for a month at least, as I spent the last weeks just in front of my working PC. No parties, no social life, no changes in every day life. I feel like a fuckin zombie.
And hell, I never want to draw a floor plan again (I know I'll have to, but hey, after holiday).


Last weeks weren't easy but with this two little fellas, everything was way better. Just love them.


I'll go back to learning, read you soon.

Sonntag, 3. Februar 2013

WIPs to keep the show running

Je m'apelle Klaus et je suis vingt neuf ans. J'habite à Dresden allemagne. Aujourd'hui je te donne des photos de mes projets actuel. Les photos de le guerrier de peste sont deux semaine vieux et pas de chose a changé après ca. Les photos de le guerriere futuriste sont de hier où j'ai peindre avec Martin. Mais parce que mon francais est très mal, les photos et finit avec les mots francais:


The future guy is an really early WIP. Still needs some contrast on the suit. The lights on the shoulders were kind of nasty to do, the colour got chalky and somehow I couldn't cope with it yesterday...nexttime.

For the pest warrior I need to refine it on the banner, need to blend it everywhere more into the armour and also I want to try to build up some texture with pigments and plaster....experimentalalalalal...but this has to wait till the future guy is done.

So see you soonish et peut-être en francais....nooo don't think so...or...we'll see....